Branching in GIT
So, now you know Git! We will dive into something a bit more complex now :)
Programmers sometimes need to work on two or even more projects at the same time. Let's imagine that a severe mistake is found and needs to be fixed as soon as possible.
So the programmer has to leave what she is currently working on and goes back to a "stable" version, fixes the error and releases a new version to the customers.
After this, she goes back to the original project. But before that, she should also incorporate the fix of the error into the version she is currently working on.
Git has so called branches exactly for this purpose. On a single "branch" you can work, but you can switch to another (even older) branch, do some changes and then change back to new branch and continue, or merge the changes.
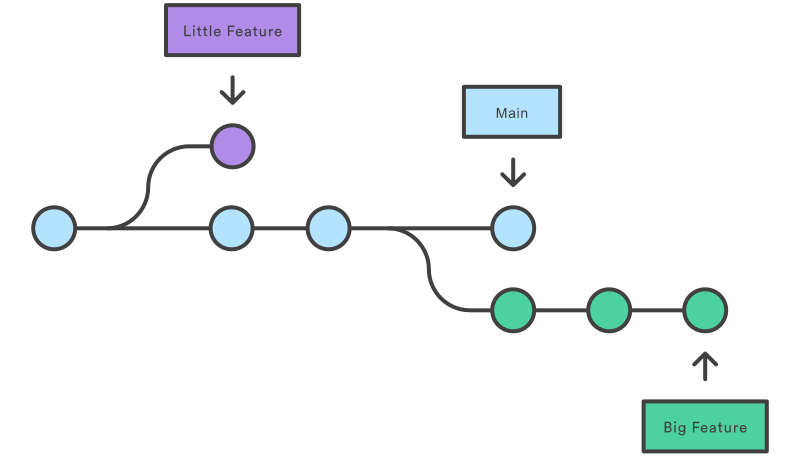
Branching comes handy also when more people are working on a same project - everyone is working on his/her own branch and when the time comes, all changes are combined (merged) together.
Instead of copying files from directory to directory. Git stores a branch as a reference to a commit. In this sense, a branch represents the tip of a series of commits—it's not a container for commits.
You can check what branches you have in your repository.
For that, we have a command git branch:
$ git branch
* main
We should have only one and it is called main.
– it is a traditionally name of "backbone" branch for the project
- In the last two years there was a commonly accepted default branch name change from master to main, so in older project you can still find master branches, while GitHub by default already creates main branch.
To create a new branch, you will again use command git branch.
You will just add a name of the branch as an argument as well.
So if you want to add the name of the author to the poem,
you can name the branch adding-author.
$ git branch adding-author
$ git branch
  adding-author
* main
This command created a new branch, but it does not switch into it yet.
The asterisk symbol in the output of git branch is showing, on which branch you are working.
In this case, it is still main.
To switch between branches, you need another command:
$ git checkout adding-author
Switched to branch 'adding-author'
$ git branch
* adding-author
  main
So, now you are "on" branch adding-author. It also means that your HEAD is there - HEAD refers to the currently checked-out branch's latest commit.
Now add some author name into your file poem.txt. And with the help of git add and git commit perform new commit.
Perfect! You can check how it looks using git show, git status or git log.
Let's leave the adding the author of the poem for a moment.
Go back to branch main and create a branch called
adding-name from it.
Then switch to this new branch.
$ git checkout main
Switched to branch 'main'
$ git branch adding-name
$ git checkout adding-name
Switched to branch 'adding-name'
$ git branch
  adding-author
* adding-name
  main
Now add the name of the poem to the file in your text editor and using the same procedure
as before by using commands git add poem.txt, git commit -m "commit message" save the commit.
Again, check everything using git show, git status or git log.
This is a simple example how you can solve the situation from the introduction:
Leaving work in progress, switch to "stable" version main and
start working in a completely different project part.
You can switch between the versions as you want to,
but it is always a good habit to do a new commit:
(git commit) and with help of git status confirm,
that everything is where it is supposed to be.
Collaboration of multiple people on same project works on the exactly same principle:
There is a common base (main) and every member
is working on his/her own branch until all expected changes are there.
When a certain branch is ready, it can be incorporated back into main.
Let's see how to do it!
Merging
It would make no sense to split the history of a project, if there would be no way how to merge it back together. Luckily for us, merging in git is quite easy. Do not trust people who tell you otherwise. You will be the professional to impress others with your git skills.
Switch back to main
and use commit git merge with a name of branch you want to merge.
This commit will merge branch you want into main.
$ git checkout main
Switched to branch 'main'
$ git merge adding-name
Updating e929fb0..c982a81
Fast-forward
 poem.txt | 6 +++++-
 1 file changed, 5 insertions(+), 1 deletion(-)
Merged! This „Fast-forward” means, that there was nothing to actually
"merge" - we just added new changes from another branch into the branch main.
You can check how it looks using git log or git status.
And now try to merge the second branch too -
git merge adding-author.
Here it might be more complicated: It can happen that changes can't be
automatically merged together and in the command line we will see output as
merge conflict. The reason for it is that git can not in this case
safely know "which way to merge to be 100% correct".
A common example is if two commits in different branches edit the same line of code. You will probably know which way is correct but git usually can not, as there can be three options: Keep just changes from the first commit, keep just the changes from the second commit or make custom changes (which usually means use both changes but adapt the code a bit).
How to solve merge conflicts?
Open the file in editor and you should see a content of both versions
marked with signs (">>>" usually) which points to the exact location where conflict happened.
Change the file to look like it should (also remove the signs), save it and do a commit
git commit.
Whether there was a conflict or not, there will be a special merge commit
$ git merge adding-author
Auto-merging poem.txt
Merge made by the 'recursive' strategy.
 poem.txt | 2 ++
 1 file changed, 2 insertions(+)
Everything worked?
If yes, you can delete old branches - all their changes are inside the main
and there is usually no reason to continue work on them. You can always create a new branch later again.
$ git branch -d adding-author
Deleted branch adding-author (was 0e213cd).
$ git branch -d adding-name
Deleted branch adding-name (was c982a81).
$ git branch
* main
Congratulations, now you are able to use branches and merge them. This brings you further on your adventure in getting to know git as a programming collaboration tool.