Git
Whether you code or write documents, often you end up with multiple versions of the same file. You may want to archive one set of changes that are not needed at the moment, then send another set of changes to your colleagues for a review. At a certain point, keeping track of all these versions becomes unfeasible.
Tools like Dropbox or Google Drive, which you may know already, can help a bit. These tools allow you to share your files easily, or to restore their content to an earlier point in time. Here's an example:
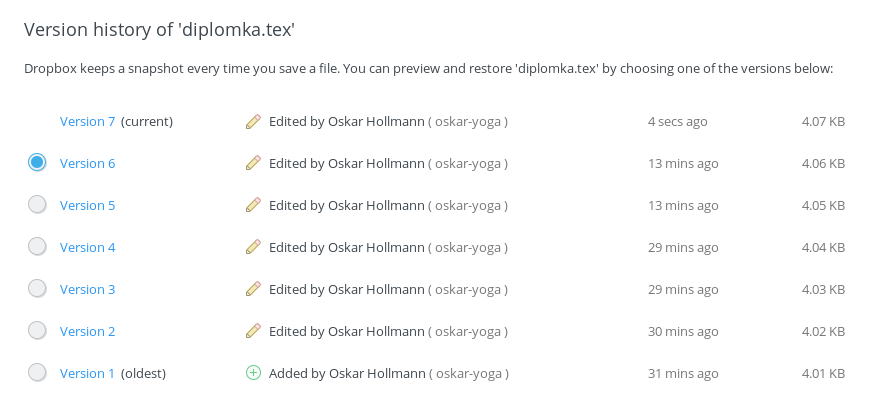
Unfortunately, you can only see different versions of a single file. Also, it's hard to tell which version you might want to restore since there is no indication of how individual versions differ. A relatively large project wouldn't be manageable with this approach.
Therefore, programmers tend to use more powerful tools called version control system (VCS). Currently, the most popular one is Git, and we'll learn more about it in this lesson.
Real programs are rarely created by a single person. Two heads are better than one, so it's better to work on a project in a team.
Each team member needs to be able to share their progress with others. Git can be used exactly for that: you can set up a shared repository online that your team members will synchronize with.
We will rely on the command line. If you are not confident working with it yet, look at the introduction.
Remember: don't write the $ at the start.
It is shown here to indicate the beginning of each command.
Installation
The process of installing Git is described here. If you have skipped the lesson before, you might want to get back to it now.
Repository
Each project that you want to version-control needs to be stored in its own directory.
Create a new directory now and navigate inside (use the command cd).
Then, create a new Git repository using the command git init:
$ mkdir lessongit
$ cd lessongit
$ git init
Initialized empty Git repository in ./.git/
At first glance, it looks like nothing happened.
This command created a hidden directory with the name .git and stored some
information about history in there.
You can see the file using ls -a (Linux) or dir /a (Windows).
.git is a hidden directory because it is managed only by Git
and you shouldn't be changing anything inside.
The repository is empty for now - it does not have any files or history.
You can see for yourself by invoking git status, a command that shows information
about the state of the repository:
$ git status
On branch main

Initial commit

nothing to commit (create/copy files and use "git add" to track)
“On branch main” refers to so-called branches, we'll get back to that later. “Initial commit” means that there is no commit stored yet. And “nothing to commit” says that there are no files to be saved and versioned in the directory.
First commit
We will now switch for a moment to a plain Text Editor (not Microsoft Word but for example Notepad) or optionally Code Editor (VS Code).
Now create a new text file there, write/copy a short poem text inside and save it in the folder where you originally did git init in your command line. Name the file poem.txt and do not forget to save it after you made the edits.
As a quick source of totally unbiased texts to work with, you can have a look here:
The file should span at least five lines so that we have enough to work with.
Then, try executing git status again: Git reports that there is a new
file in the directory and that it isn't managed by Git yet.
$ git status
On branch main

Initial commit

Untracked files:
  (use "git add <file>..." to include in what will be committed)

        poem.txt

nothing added to commit but untracked files present (use "git add" to track)
If the state of folder is not looking the same for you
Double check that you have created the file in the same folder as where you did run the git init
You can check by listing the content of the folder (ls or dir) in the terminal.
We need to make Git track each new file explicitly. Let's do that for the file with your poem:
$ git add poem.txtThen check the state of the repository again:
$ git status
On branch main

Initial commit

Changes to be committed:
  (use "git rm --cached <file>..." to unstage)

        new file:   poem.txt
The lines in green (“changes to be committed”)
will be included in the next batch of changes (a commit) that you will create.
Let's create our first commit and add a commit message "First commit" via a "-m" suffix:
$ git commit -m "First commit"
[main (root-commit) 1a009f4] First commit
 1 file changed, 6 insertions(+)
 create mode 100644 poem.txt
Congratulations! Your first commit in the repository is finished!
What would happen if you did not add the -m "message" - read the text below. Otherwise you can skip the text block.
Working with editors
Without the -m "message" after entering this command, an editor would open where you can write a short description of this commit, briefly summarizing what changes have been made. In Windows, if you have set up your Git correctly, Notepad will be used as the editor; simply write something, save (Ctrl+S) and close (Alt+F4).
In Linux or macOS, an editor called Nano appears directly in the command line window. You can recognize it by the keyboard shortcut help on the bottom two lines. Write something, save using Ctrl+O, confirm the name of the file (Enter) and exit the editor using Ctrl+X.
If you haven't set up Git accordingly, Vim is invoked directly in the command line window
and will be used as the default editor.
It is a relatively complicated editor and learning to use it is beyond the scope
of this lesson. You can recognize it by one or two lines at the bottom that show a path
to a temporary file that you are currently editing.
In that case, first press
Esc, then type :q! (colon, lower letter Q, exclamation mark)
and confirm by pressing Enter.
Then set up Git correctly and try git commit again.
You can ignore the existing lines starting with #, these are just for your information.
Git will ignore them as well. Finally, save the file and close the editor.
Try reporting on the repository again:
$ git status
On branch main
nothing to commit, working tree clean
This short report means that nothing has changed since the last commit. That is expected since we've just commited all our changes!
Now let's have a look at what has changed in the last commit.
Execute git show:
$ git show
commit 1a009f4267d5a6ab7ece87cb7514f5b803692e39
Author: Adéla Novotná <adela.novotna@example.cz>
Date:   Mon Mar 20 14:51:34 2017 +0100

    First commit

diff --git a/poem.txt b/poem.txt
new file mode 100644
index 0000000..558d133
--- /dev/null
+++ b/poem.txt
@@ -0,0 +1,6 @@
+Holka modrooká, nesedávej u potoka
+Holka modrooká, nesedávej tam
+
+V potoce je hastrmánek
+Zatahá tě za copánek
+Holka modrooká, nesedávej tam
Notice the unique Git commit ID that allows you to return to this state of your project at any point in the future. The author's name, the date of this commit's creation and the commit message are also listed, along with the summary of changes: a new file poem.txt containing the text in green has been added.
When the output of a command is too long, you can browse it using the keys (↓, ↑, PgUp, PgDn). In such case, exit the browsing mode by pressing q for Quit.
Text encoding in Windows
If you have trouble with displaying special characters like letters with diacritics,
enter the following command before git show:
> set LC_ALL=C.UTF-8
This command will only configure the current command line window. It will have to be entered for any new window that you open.
Second commit
Make a small change in your poem; replace one word, change punctuation, or add a new verse. Then check the status of the Git repository again.
$ git status
On branch main
Changes not staged for commit:
  (use "git add <file>..." to update what will be committed)
  (use "git checkout -- <file>..." to discard changes in working directory)

        modified:   poem.txt

no changes added to commit (use "git add" and/or "git commit -a")
The file is shown in red again. Something has changed inside!
To see the details, execute the command git diff.
$ git diff
diff --git a/poem.txt b/poem.txt
index 558d133..24e2384 100644
--- a/poem.txt
+++ b/poem.txt
@@ -1,6 +1,9 @@
-Holka modrooká, nesedávej u potoka
-Holka modrooká, nesedávej tam
+Holka modrooká
+Nesedávej u potoka
+Holka modrooká
+Nesedávej tam

 V potoce je hastrmánek
 Zatahá tě za copánek
-Holka modrooká, nesedávej tam
+Holka modrooká
+Nesedávej tam
The changes are shown on a per-line basis. The lines in red beginning with - indicate the original lines that have been removed; the lines in green starting with + show the newly added lines.
Even if just a single word or a letter has changed on any given line, the whole line will be listed as removed and added (including the small change). This interpretation can be customized if needed, but it's a good idea to get used to the default behavior.
It is easy to see what exactly has changed since the last commit.
If your program stops working, but the last commited version still worked,
use git diff –
one of the changes listed must have introduced the error!
The line beginning with @@ indicates the location in the file where the changes occur. In the example above, the excerpt of the original file starts at line number 1 and it is 6 lines long; the matching block in the changed varsion starts at line 1 as well, but it is 9 lines long.
If you are satisfied with the changes, stage them for the next commit:
$ git add poem.txtAs usual, check the status of the repository; the file in green will be included
within the next commit.
$ git status
On branch main
Changes to be committed:
  (use "git reset HEAD <file>..." to unstage)

        modified:   poem.txt
Before we finalize the next commit, let's talk about the best practices
in formulating the commit messages.
There are common conventions that most programmers follow:
the first line summarizes the changes, the second line is left blank,
and the following lines list the reasons for the change or describe
the changes themselves in more detail.
Each line should have under 70 characters in length;
the lenth of the comments (lines starting with #) can serve as a guide here.
It is not worth going into detail for changes that are trivial or obvious;
rather, focus on the broader context and reasons for the changes.
Anything that can help whomever will try to understand the changes in the commit;
this might include you few months later.
My commit message will be the following:
Split long lines

Typically, each verse of a poem goes on its own line. I think
that it's easier to read like this. (Although, the real reason was
to demonstrate git diff.)
If you ever have trouble summarizing your changes using just 70 characters, you might be taking too many steps at once. E.g. "change string X and add loop Y" might be better to commit as two separate revisions.
Finally, use git commit to create your second commit,
and then check it using git show:
$ git show
commit 81cbabb3bd3cd2f3896dd41b20012c44dbd69031
Author: Adéla Novotná <adela.novotna@example.cz>
Date:   Mon Mar 20 14:51:34 2017 +0100

    Split long lines

    Typically, each verse of a poem goes on its own line. I think
    that it's easier to read like this. (Although, the real reason was
    to demonstrate git diff.)

diff --git a/poem.txt b/poem.txt
index 558d133..24e2384 100644
--- a/poem.txt
+++ b/poem.txt
@@ -1,6 +1,9 @@
-Holka modrooká, nesedávej u potoka
-Holka modrooká, nesedávej tam
+Holka modrooká
+Nesedávej u potoka
+Holka modrooká
+Nesedávej tam

 V potoce je hastrmánek
 Zatahá tě za copánek
-Holka modrooká, nesedávej tam
+Holka modrooká
+Nesedávej tam
Diagram
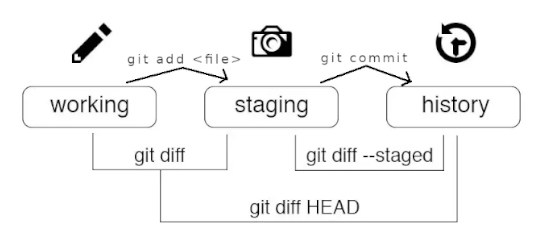
These two diagrams below visualize what each command demonstrated thus far does exactly, and how the changes move from “not staged” to “commited” and back in case of need.
Diagram showing the process of viewing and committing changes:
Now that we have created our first few commits in the repository,
let's demonstrate more commands that will help us understand
the whole history of our Git repository.
The first command is git log.
$ git log
commit 81cbabb3bd3cd2f3896dd41b20012c44dbd69031
Author: Adéla Novotná <adela.novotna@example.cz>
Date:   Mon Mar 20 14:51:34 2017 +0100

    Split long lines

    Typically, each verse of a poem goes on its own line. I think
    that it's easier to read like this. (Although, the real reason was
    to demonstrate git diff.)

commit 1a009f4267d5a6ab7ece87cb7514f5b803692e39
Author: Adéla Novotná <adela.novotna@example.cz>
Date:   Mon Mar 20 14:51:34 2017 +0100

    First commit
git log prints all commits starting from the newest one and going
all the way back to the initial commit at the origin of the repository.
When there are so many commits that they don't fit on a single screen of your command line window, you can browse back and forth using PgUp/PgDn. Finally, exit by pressing q.
There are many options that customize the output of git log.
They are all described (at great length)
in the built-in documentation (command git help log).
If the help is displayed in the command line window, press q
to exit.
My personal favorite combination is git log --oneline --graph --decorate --cherry-mark --boundary.
To see all details about any commit,
execute git show 5ff0b, replacing 5ff0b
with the first few characters of the Git commit ID.
Conclusion
These are the Git basics that we'll need in the following lessons.
Whenever you perform git add file and git commit,
the current version of the file is saved and will be accessible even if you delete the file later.
You can always view any past version of any file in your repository,
and review all changes made since the last time the project was saved.
Maybe all this sounded unnecessarily too complicated for a beginner. Indeed, our projects will be relatively simple and easy to manage even without the use of Git. But it's a good idea to learn using it from the very beginning; when you get to participate in bigger projects, already being used to Git will come very handy.
So, from now on, whenever you make even a small but meaningful change to your program,
as long as the program works at least as well as it did before,
use git add and git commit to save the change in Git.